Up and running with Asp.Net Core on an Ubuntu server
So here are a couple of firsts. My first blog entry, my first dabble with Asp.Net Core and quite possibly the first tutorial on getting a database driven website working using Asp.Net Core and SQL Server all running on Linux. There's a bit to cover and I'm not suggesting my way is the only way to do it, however I'm developing on Windows using Visual Studio 2017 against the Asp.Net Core runtime version 1.1.2
This project is brilliant, and run by Halil İbrahim Kalkan. Make sure you have Asp.Net Core selected, not MVC 5 and decide which frontend you want, Angular or Multipage Web Application. I went with Multipage, but it probably won't make any difference which you choose. Also, include the "module-zero" option.
This is a multi-project solution with quite a few dependencies so on first open it takes a while to download all its dependencies from Nuget. By default this project will set up a database on your local machine using an integrated Windows security string connection. We'll go with this for now, but later we'll change it to an SQL security string, as this is what SQL Server currently supports on Linux.
So, first things first, once your solution has settled down and builds, go to the Package Manager Console, make sure you have the Entity Framework project selected and then run:
Open Sql Server Management Studio to check that it has been created. If so, let's run the project and see if we can login.
Default user is admin, default password is 123qwe.
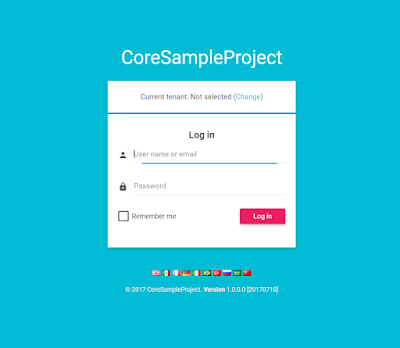
Ok, great, your template should be up and running in the browser.
While we're at it, we will publish the solution to a file system for now. Go to Build, Publish and publish to a file system. We're doing it like this to keep things simple. Later we will SFTP this to our Linux server.
Now, apart from the fact that Asp.Net Core is currently receiving a lot of developer love because it's the new new thing in the world of the .Net developer, its most compelling feature for me is the fact that it is platform agnostic. For this very reason I'm wholly unconcerned about running it against the "full fat" Windows only DotNet runtime 4.6.1 or 4.7. Although this is possible it detracts completely from the main reason I'd want to develop an app in Asp.Net Core, which would be to host on a Linux box, for instance an Ubuntu server such as providers like Linode offer starting for as little as $5 a month.
Today however we're going to set up our own Linux server running as a virtual machine on our PC operating system. If you're on Windows like I am, and you have Hyper-V installed, but want a simpler VM setup, download a copy of Virtual Box and install it on your machine. You can disable Hyper-V if you have it installed, by following the instructions offered by Scott Hanselman here.
Once Virtual Box is installed, or VMWare or whatever you use, go and get a nice fresh copy of the long term support version of Ubuntu Server, here. It's small as far as OS's go, only 850mb. I'm assuming you're familiar with setting up a VM from an ISO file, so ahead and do it, I'll wait once you have Ubuntu installed and running. At some point in the installation it offers you an automated setup using a couple of different packages it can install. Just go with the standard components for now, we'll install what we need once it's up and running. It will also prompt you to create a sudo user at some point in the installation. Remember this username/password combination, or write it down.
Once you've booted your VM and logged in, let's install SSH on the server because that's what we'll be using to connect to it. At the command prompt enter:
Let's see if we can SSH into the Ubuntu VM. Type:
Once in, let's start by doing an update of your server. Type:
First, register the Microsoft Linux repositories and add their keys with the following commands:
Originally, the database was created using a connection string that defaults to your local machine, and uses Windows Integrated Security. Now we will change the connection string to connect to the VM and use SQL Server authentication.
Go to your solution's default Web project, in my case it is CoreSampleProject.Web.Mvc. In the root of the project you'll find the appsettings.json file. Change the connection string setting to look like this:
As an aside, the first time I tried this, I had a syntax error in my connection string, I left out a semi-colon. As a result, the tables were created in the master db! I had to uninstall and reinstall SQL Server on the VM. If for whatever reason this happens to you, click here to go through the process.
Ok, now we are ready to rerun the Entity Framework code-first command to create the database. Run the following from the Package Manager console:
Run the following command
In FileZilla set up a connection: Type is SFTP SSH, host being the VM ip address, logon type normal and your VM user name and password.
Note: Don't forget to republish your web app, it needs your updated connection string to run on the VM. Do as before, publish to a file system output.
Copy the contents of your published folder, (in my case it's D:\Work\DotNetCore\CoreSampleProject\src\CoreSampleProject.Web.Mvc\bin\Release\PublishOutput) to the /tmp folder. Create a directory there like /tmp/myapp or something similar:
If you're familiar with vim, create it using this command:
The contents of the file is as follows:
Ok let's get this running now, run the following commands:

Log in with username admin password 123qwe.
And there you have it. A full working database driven Asp.Net Core app running on a Linux server, connecting to an SQL Server also running on the same Linux server. Who would have thought this could be possible even a year ago?

For my next exercise I'm going to strip out the frontend of this app and replace it with a React/Redux solution. Thanks for reading, please leave a comment if you have any questions.
Step One - Get the project
First thing is to get a ready made boilerplate app, something a bit more sophisticated than the standard project template you get after creating a web application in Visual Studio. To download this, go to https://aspnetboilerplate.com/Templates.This project is brilliant, and run by Halil İbrahim Kalkan. Make sure you have Asp.Net Core selected, not MVC 5 and decide which frontend you want, Angular or Multipage Web Application. I went with Multipage, but it probably won't make any difference which you choose. Also, include the "module-zero" option.
This is a multi-project solution with quite a few dependencies so on first open it takes a while to download all its dependencies from Nuget. By default this project will set up a database on your local machine using an integrated Windows security string connection. We'll go with this for now, but later we'll change it to an SQL security string, as this is what SQL Server currently supports on Linux.
So, first things first, once your solution has settled down and builds, go to the Package Manager Console, make sure you have the Entity Framework project selected and then run:
Update-DatabaseThis is a code-first project so it will build the database for you and seed it with initial data.
Open Sql Server Management Studio to check that it has been created. If so, let's run the project and see if we can login.
Default user is admin, default password is 123qwe.

Ok, great, your template should be up and running in the browser.
Step Two - Install Ubuntu Server as a VM
Now, in theory, because this is an Asp.Net Core project running against the Dotnet Core framework, it should run just as happily on a Linux machine. And as I discovered, this is indeed the case. However, like all new tech it requires a fair amount of fiddling to get it to work. I've no doubt the process will be a lot simpler in future, but because the tooling is currently a bit patchy we have to fill in those gaps.While we're at it, we will publish the solution to a file system for now. Go to Build, Publish and publish to a file system. We're doing it like this to keep things simple. Later we will SFTP this to our Linux server.
Now, apart from the fact that Asp.Net Core is currently receiving a lot of developer love because it's the new new thing in the world of the .Net developer, its most compelling feature for me is the fact that it is platform agnostic. For this very reason I'm wholly unconcerned about running it against the "full fat" Windows only DotNet runtime 4.6.1 or 4.7. Although this is possible it detracts completely from the main reason I'd want to develop an app in Asp.Net Core, which would be to host on a Linux box, for instance an Ubuntu server such as providers like Linode offer starting for as little as $5 a month.
Today however we're going to set up our own Linux server running as a virtual machine on our PC operating system. If you're on Windows like I am, and you have Hyper-V installed, but want a simpler VM setup, download a copy of Virtual Box and install it on your machine. You can disable Hyper-V if you have it installed, by following the instructions offered by Scott Hanselman here.
Once Virtual Box is installed, or VMWare or whatever you use, go and get a nice fresh copy of the long term support version of Ubuntu Server, here. It's small as far as OS's go, only 850mb. I'm assuming you're familiar with setting up a VM from an ISO file, so ahead and do it, I'll wait once you have Ubuntu installed and running. At some point in the installation it offers you an automated setup using a couple of different packages it can install. Just go with the standard components for now, we'll install what we need once it's up and running. It will also prompt you to create a sudo user at some point in the installation. Remember this username/password combination, or write it down.
Once you've booted your VM and logged in, let's install SSH on the server because that's what we'll be using to connect to it. At the command prompt enter:
sudo apt-get install sshThis will install SSH on the server which will let us log into the machine as if it was somewhere on the internet. Also, let's get this server's IP address, type in:
ifconfigand write down the IP address of your VM.
Step Three - Connect to the Ubuntu VM
Next job is to fire up your favourite command line utility so we can SSH into the Ubuntu Server VM. I have the Ubuntu subsystem installed on my Windows OS. This is not to be confused with the Ubuntu VM we've created, it's a Windows component you can install, which gives you a whole bunch of Linux functionality. At my Windows console I type bash and enter my Ubuntu username and login.Let's see if we can SSH into the Ubuntu VM. Type:
ssh youruser@123.456.789.012(obviously substitute it with the actual user and ip of your VM).
Once in, let's start by doing an update of your server. Type:
sudo apt-get updateand let it run.
Step Four - Install Microsoft SQL Server 2017 on Ubuntu VM
We'll start by downloading and installing SQL Server 2017 for Linux. This is a 180 day evaluation copy. Around this time Microsoft has indicated it will be offering the same versions of SQL Server on Linux that there are currently available on Windows so there will at some point be a free Express version you can download and install.First, register the Microsoft Linux repositories and add their keys with the following commands:
curl https://packages.microsoft.com/keys/microsoft.asc | sudo apt-key add -
curl https://packages.microsoft.com/config/ubuntu/16.04/mssql-server.list | sudo tee /etc/apt/sources.list.d/mssql-server.list
Now install SQL Server:
sudo apt-get install mssql-serverOnce it's downloaded let's install and configure it:
sudo /opt/mssql/bin/mssql-conf setupYou'll be prompted for the sa or server administrator password. We'll use this for now for our db connection, bad practice but ok for learning purposes. Finally, we'll also install SQL Server Agent so that we have added functionality through SQL Server Management Studio
sudo apt-get install mssql-server-agentWhen that's done your SQL Server should be up and running. You can go to your SQL Server Management Studio, type in the IP of the VM for the server to connect to, use SQL Server authentication and login to the SQL Server via the sa password you set earlier. Et voilà, SQL Server up and running on Linux!
Step Five- Create the database on the Ubuntu VM
Remember how earlier we used Update-Database with Entity Framework in a database code-first approach to create the database on our local machine's SQL Server? We're going to repeat that to do exactly the same on the Ubuntu VM through Visual Studio 2017.Originally, the database was created using a connection string that defaults to your local machine, and uses Windows Integrated Security. Now we will change the connection string to connect to the VM and use SQL Server authentication.
Go to your solution's default Web project, in my case it is CoreSampleProject.Web.Mvc. In the root of the project you'll find the appsettings.json file. Change the connection string setting to look like this:
"ConnectionStrings": {
    "Default": "Data Source=123.456.789.012,1433; Initial Catalog=CoreSampleProjectDb; User Id=sa; password=yourpassword"
  },
Replace details with your own. Note the 1433 port is explicitly defined, for some reason it needs this on my setup. Also, using the sa user is bad practice, but for our purposes we'll use it for this tutorial.As an aside, the first time I tried this, I had a syntax error in my connection string, I left out a semi-colon. As a result, the tables were created in the master db! I had to uninstall and reinstall SQL Server on the VM. If for whatever reason this happens to you, click here to go through the process.
Ok, now we are ready to rerun the Entity Framework code-first command to create the database. Run the following from the Package Manager console:
Update-DatabaseTo check, go to Sql Server Management Studio, connect to your VM via the IP address and sa user/password, and check that the database has indeed been created. Great, let's move on.
Step Six - Install DotNet Core on the Ubuntu VM
Ok we're getting there now. Next we have to install dotnet core on our Linux box. Although the very latest version is 2.0 preview 3 we need version 1.1.2 for our sample app to run against.Run the following command
sudo apt-get install dotnet-sharedframework-microsoft.netcore.app-1.1.2With dotnet installed we can get on with publishing our web app.
Step Seven - Copy the published files to the VM
Now that we have dotnet installed on the VM, let's set up an FTP client on Windows to connect to our Ubuntu server. I use FileZilla, so for this tut I'll be referencing the setup in it, however, feel free to use whatever FTP client you prefer.In FileZilla set up a connection: Type is SFTP SSH, host being the VM ip address, logon type normal and your VM user name and password.
Note: Don't forget to republish your web app, it needs your updated connection string to run on the VM. Do as before, publish to a file system output.
Copy the contents of your published folder, (in my case it's D:\Work\DotNetCore\CoreSampleProject\src\CoreSampleProject.Web.Mvc\bin\Release\PublishOutput) to the /tmp folder. Create a directory there like /tmp/myapp or something similar:
mkdir ~/tmp/myappNow we'll copy the contents of the directory to /var/www/coresite. The directory "coresite" must be created but you'll probably find you don't have permissions to create it (By the way, I'm just calling it coresite, you can name it whatever you prefer). To get permissions on a directory use this command, first to own it (nick being my username):
chown -R nick /var/wwwAnd then to create the permissions you need run:
chmod -R 755 /var/wwwNow you can make a directory, either through your FTP client or by running:
mkdir ~/var/www/coresiteOnce that's done let's copy all the published files to /var/www/coresite by using scp:
scp -r /tmp/myapp/* myuser@123.456.789.012:/var/www/coresiteAdjust that to your details and run. This will copy all the files needed to run the app to folder we're going to run it from. Ok, next step is to set up the web server.
Step Eight - Set up Kestrel on the VM
First we must setup systemd to run dotnet as a service. We need to create a file called kestrel-coresite.service.If you're familiar with vim, create it using this command:
sudo vim /etc/systemd/system/kestrel-coresite.serviceIf you don't want to create or edit this file with vim, create it on your local machine using your favourite editor and the upload it to the directory /etc/systemd/system
The contents of the file is as follows:
[Unit]
    Description=CoreSite

    [Service]
    WorkingDirectory=/var/www/coresite
    ExecStart=/usr/bin/dotnet /var/www/coresite/CoreSampleProject.Web.Mvc.dll
    Restart=always
    RestartSec=10    # Restart service after 10 seconds if dotnet service crashes
    SyslogIdentifier=dotnet-CoreSampleProject.Web.Mvc.dll
    User=www-data
    Environment=ASPNETCORE_ENVIRONMENT=Production

    [Install]
    WantedBy=multi-user.target
Note that the binary referenced is the dll of your Web project in your solution. Make sure you reference your correct one in your project. Mine is CoreSampleProject.Web.Mvc.dllOk let's get this running now, run the following commands:
sudo systemctl enable kestrel-coresite.service # this registers the service
sudo systemctl start kestrel-coresite.service  # this starts the service
sudo systemctl status kestrel-coresite.service # checks to see if the service is running
That last "status" command should result in something like this appearing in your console:
kestrel-coresite.service - CoreSite
   Loaded: loaded (/etc/systemd/system/kestrel-coresite.service; enabled; vendor preset: enabled)
   Active: active (running) since Sat 2017-07-15 09:56:11 SAST; 1 day 3h ago
 Main PID: 1215 (dotnet)
    Tasks: 41
   Memory: 528.8M
      CPU: 2min 14.925s
   CGroup: /system.slice/kestrel-coresite.service
           └─1215 /usr/bin/dotnet /var/www/coresite/CoreSampleProject.Web.Mvc.dll

Jul 15 09:56:11 ubuntuServerVM systemd[1]: Started CoreSite.
Jul 15 09:56:37 ubuntuServerVM dotnet-CoreSampleProject.Web.Mvc.dll[1215]: Hosting environment: Production
Jul 15 09:56:37 ubuntuServerVM dotnet-CoreSampleProject.Web.Mvc.dll[1215]: Content root path: /var/www/coresite
Jul 15 09:56:37 ubuntuServerVM dotnet-CoreSampleProject.Web.Mvc.dll[1215]: Now listening on: http://localhost:5000
Jul 15 09:56:37 ubuntuServerVM dotnet-CoreSampleProject.Web.Mvc.dll[1215]: Application started. Press Ctrl+C to shut down.
Ok now we have the site running on http://localhost:5000. Let's check that this is the case:
wget http://localhost:5000You should see something like this:
--2017-07-16 13:57:17--  http://localhost:5000/
Resolving localhost (localhost)... ::1, 127.0.0.1
Connecting to localhost (localhost)|::1|:5000... connected.
HTTP request sent, awaiting response... 302 Found
Location: http://localhost:5000/Account/Login?ReturnUrl=%2F [following]
--2017-07-16 13:57:17--  http://localhost:5000/Account/Login?ReturnUrl=%2F
Reusing existing connection to [localhost]:5000.
HTTP request sent, awaiting response... 200 OK
Length: unspecified [text/html]
Saving to: ‘index.html.3’

index.html.3                                [ <=>                                                                         ]   7.14K  --.-KB/s    in 0s

2017-07-16 13:57:17 (37.1 MB/s) - ‘index.html.3’ saved [7307]
Ok if all is well we'll set up nginx next.
Step Nine - Set up nginx on the VM
Kestrel is the web server that dotnet apps run on by default, but it is not meant to be internet facing. Microsoft recommends that you set up a reverse proxy utility instead. Such a beast is nginx and it's very easy to setup. First we will install it:sudo apt-get install nginxNow we need to find a file and replace its contents entirely. Use vim or your favourite editor to do this:
sudo vim /etc/nginx/sites-available/defaultThe contents of the file should be replaced with:
server {
    listen 80;

    location / {
        proxy_pass http://localhost:5000;
        proxy_http_version 1.1;
        proxy_set_header Upgrade $http_upgrade;
        proxy_set_header Connection keep-alive;
        proxy_set_header Host $host;
        proxy_cache_bypass $http_upgrade;
    }
}
Ok let's test it:
sudo nginx -tThe output should be:
nginx: the configuration file /etc/nginx/nginx.conf syntax is ok
nginx: configuration file /etc/nginx/nginx.conf test is successful
And now we reload it:
sudo nginx -s reload
Step Ten - Run the web app
Finally we're able to run the app. Navigate to http://123.456.789.012 on your browser, replacing that with the IP of your VM:
And there you have it. A full working database driven Asp.Net Core app running on a Linux server, connecting to an SQL Server also running on the same Linux server. Who would have thought this could be possible even a year ago?

For my next exercise I'm going to strip out the frontend of this app and replace it with a React/Redux solution. Thanks for reading, please leave a comment if you have any questions.
great post!
ReplyDeleteThank you
DeleteGreat Nick. Thanks
DeleteHello, mine doesnt seem to work. i have done everything i'm supposed to do. can you help me out?
DeleteAmazing... this really works...thanks
Delete